google.com, pub-1183232341631896, DIRECT, f08c47fec0942fa0 Anders Cooks: Easy Button

Sign Up For My Second Book

Purchase a coil bound luxury copy of my first book "Tinfoil Cooking" right here on my website. This book is printed on 80# stock and lays flat on your counter when open. You can also purchase a paperback version or an E-Book version on Amazon.ca or on Amazon.com. The book is also available all over the world on the Amazon platforms. My second cookbook is coming soon, stay tuned.
Showing posts with label Easy Button. Show all posts

Best Burger Ever

 Easiest burger ever


I've read a lot on cooking sites about the "smashed" burgers, so I got to do my own version.

Guys, it's so good and easy. 

Get some freshly ground beef; in a perfect world, it should be 30% fat or more. You can spend the money on "ground chuck," but it, as a rule, only has 20% fat, not enough fat for this kid. Talk to your butcher. At 30% fat, you have a scrumptious burger.

Ingredients:


  • Ground Beef (30% fat)
  • Larry's Seasoning salt (or just salt)
  • Avacado oil

Preferably, use a cast iron frying pan on the side burner of your BBQ; no side burner, just put the pan on the BBQ itself. Put a bit of oil in the pan and wipe it just to get coated. Turn up and get the frying pan "searing-smoking" hot.

While the pan is warming up, pour a bit of oil on a dinner plate. Make a small ball out of the ground beef, set it on a cutting board and press down with a metal or plastic flat spatula to about 3/8 of an inch.

Flip it into the avocado oil and coat on both sides. I do 3-4 burgers at the same time, depending on the crowd. Then flip the burgers onto the pan and listen to the beautiful sound it makes... about a minute or two on each side. I like my burger about medium.

I served this up with some homemade leftover "Pico de Gallo" that I made last weekend, with fire-roasted peppers (yummy)... add a bit of Gruyere cheese on top of the burger as soon as it comes off the pan... oh so good.

Serve up with your favourite beer, wine or whatever...

Enjoy

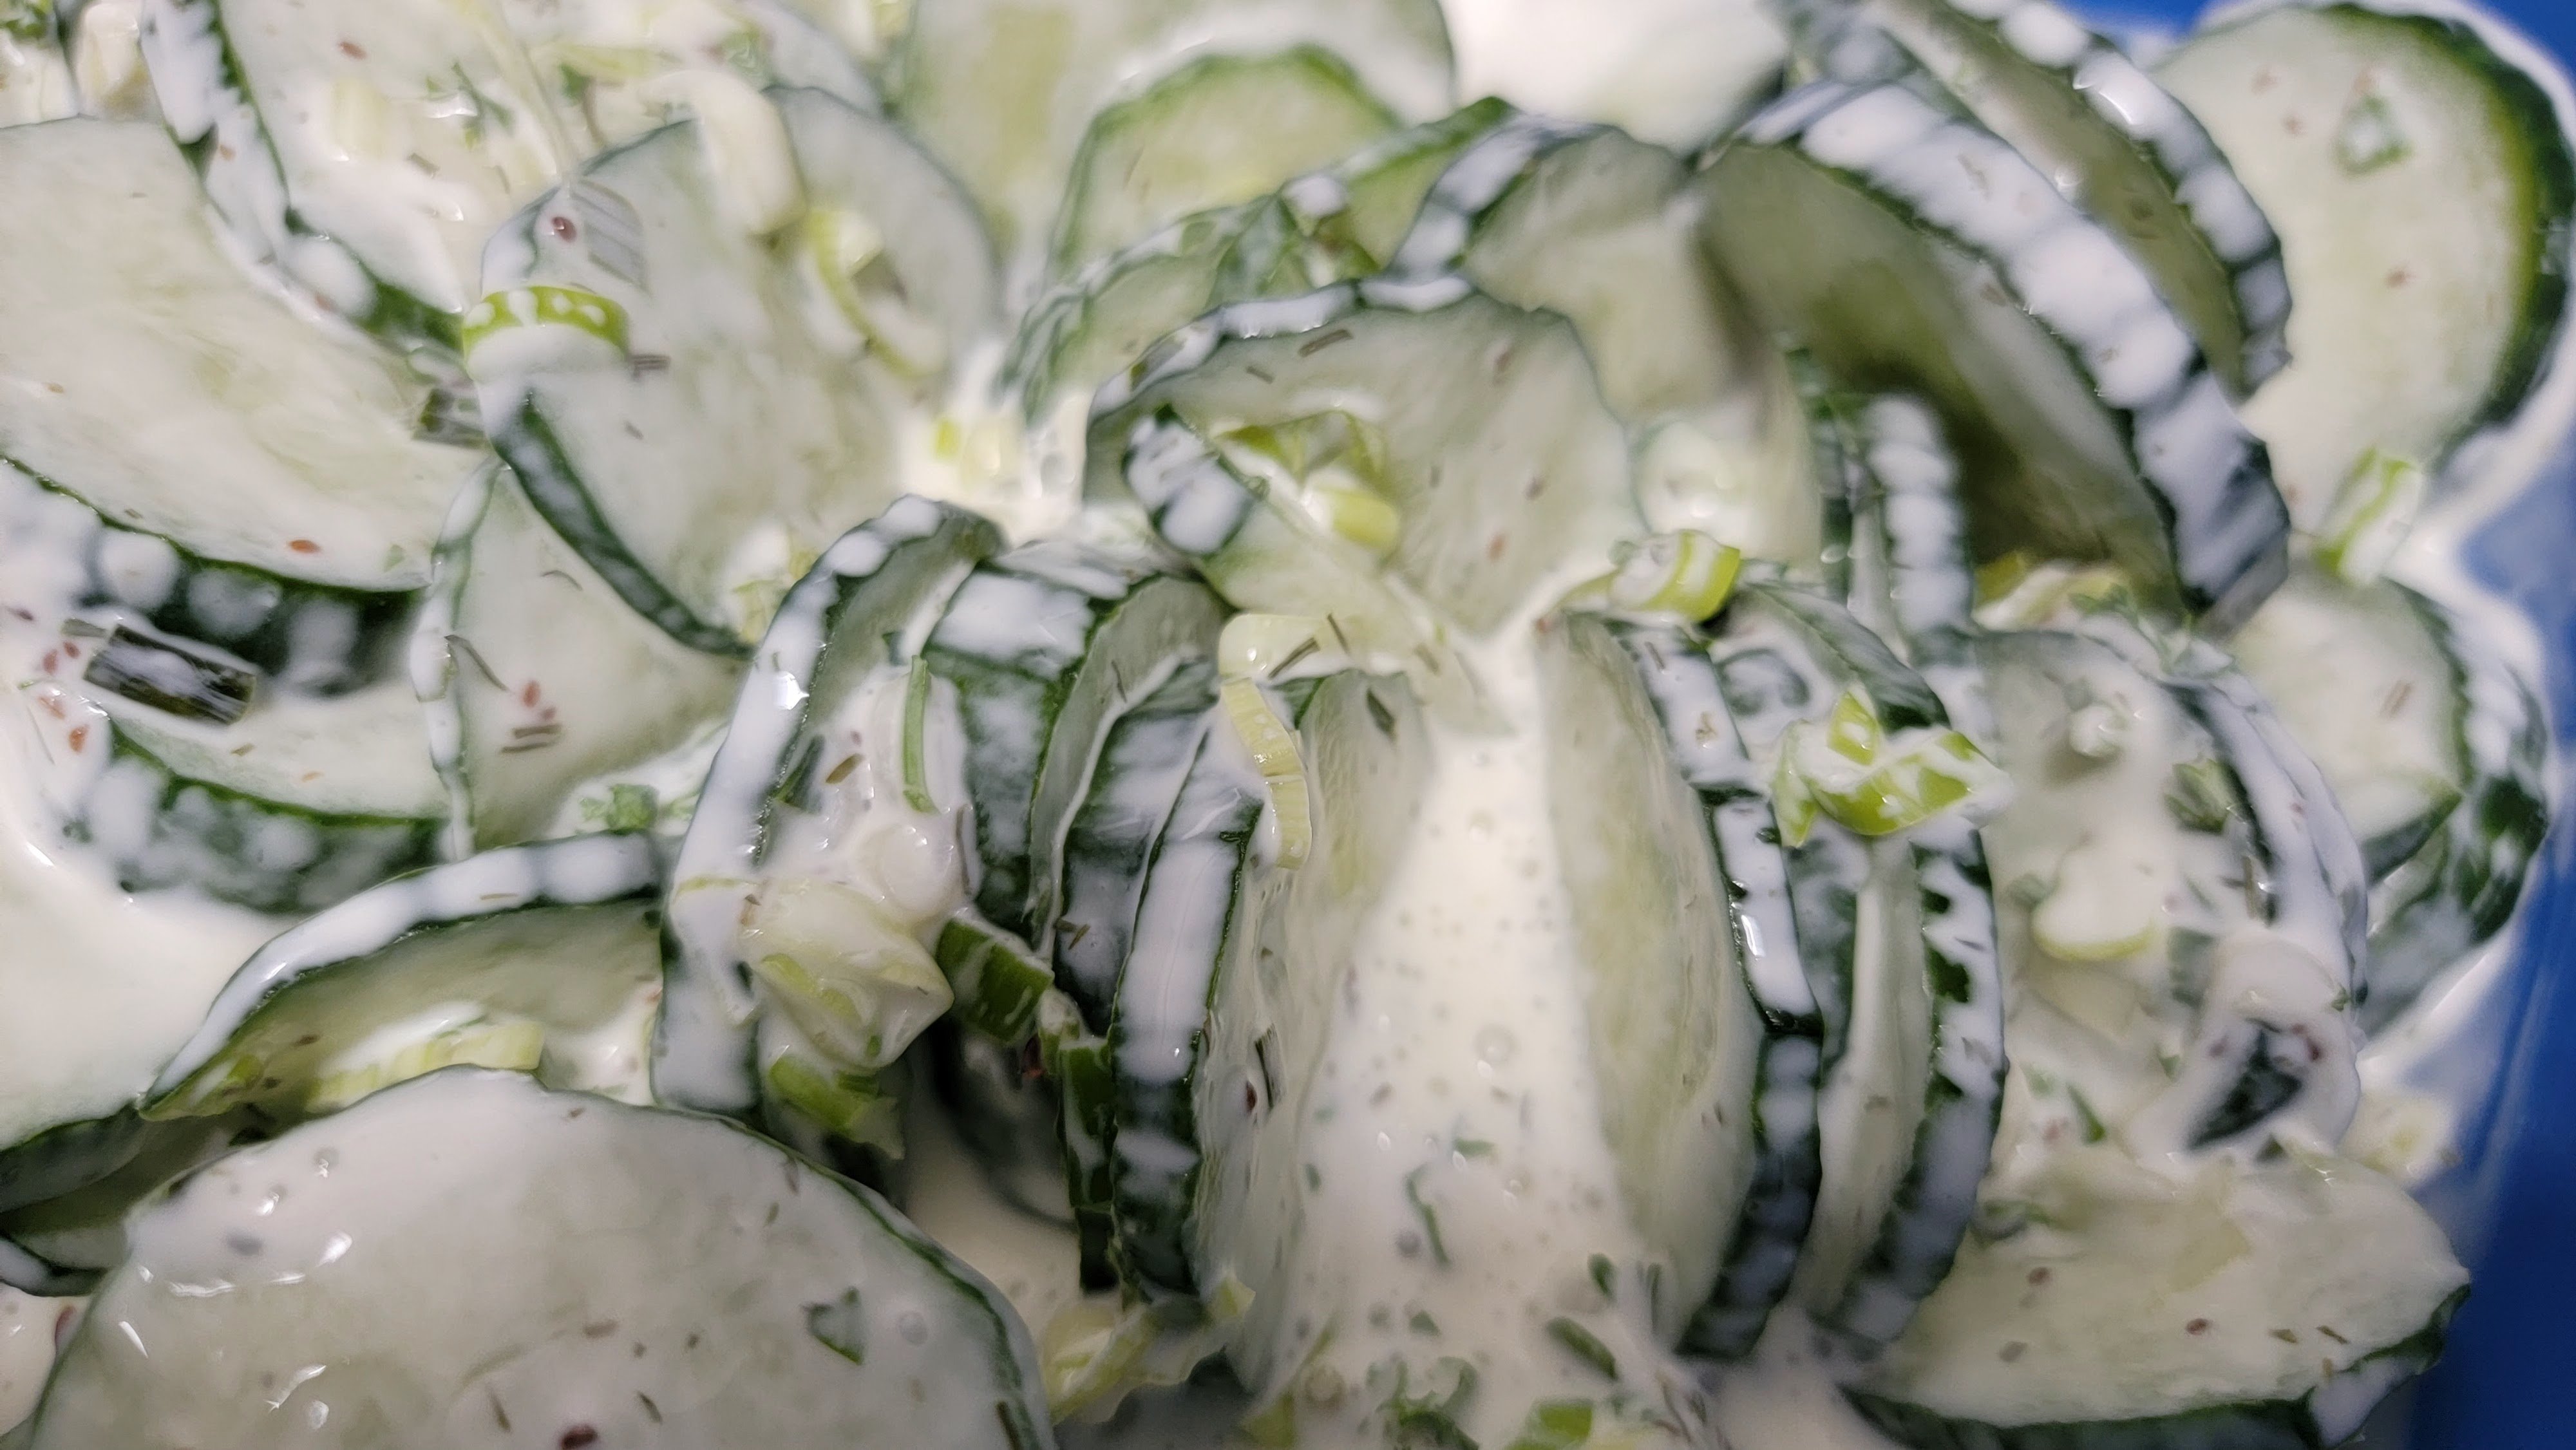
Creamy Cucumber Salad

 Creamy Cucumber Salad

I am a big fan of cucumbers and in the summer a creamy cucumber salad goes great with just about everything. Except for soup maybe?


This is super easy to make and lasts for days in the fridge. Actually, it gets better as it sits a bit.

Ingredients:

  • 2 large English cucumbers, slice about 3-4 mm or 1/8 of an inch thick.


Dressing:

  • 3/4 cup or 170 ml of sour cream (by the best and creamiest you can find)
  • 1/4 cup or 55 ml of mayonnaise (I prefer Hellman's Mayo)
  • 1/4 cup of vinegar, white, white wine or apple cider vinegar is fine.
  • 6 green onions, slide thin
  • 1 tbsp of dried dill or more if you prefer. You can also use fresh dill.
  • 1 tbsp of dried chives. You can use fresh as well.
  • 1 tsp of salt
  • 1 tsp of sugar
  • 1 tsp of celery seeds (or more)
  • 1/2 tsp of white pepper

Mix all the ingredients for the dressing in a bowl, taste and see if you would like to adjust anything. then add the cucumbers and give them a good stir so they all get coated.

After a day in the fridge, some of the water in the cucumbers will be released and you may want to add some more salt.


Sweet Onion Salad

Best Ever Sweet Onion Salad


Sweet onion salad
Sweet Onion Salad
Serves 4-6 people
Preparation and marinating time 30 minutes plus 6-12 hours for marinating.

This recipe I got from my sister Rose, she is such a great cook.

The Sweet Onion Salad goes so good with turkey burgers, hamburgers, hot dogs, beef on a bun, with pot roast, bratwurst and more.

It takes a bit of planning but it is easy to do.

Ingredients:


  • 4-5 sweet onions, halved then sliced
  • 250 ml or 1 cup of Canadian made Hellman's mayonnaise
  • 60 ml or ¼ cup of sour cream. You can substitute with crème fraîche if you wish
  • 125 ml of ½ cup of fresh chopped parsley
  • 60 ml or ¼ cup of fresh chopped chives (optional)
  • 1 tsp of celery seeds (this is optional, but I love it. It was a great suggestion from my friend Tim)


Ingredients for marinade:


  • 125 ml or ½ cup of sugar
  • 125 ml or ½ cup of cold water
  • 125 ml or ½ cup white vinegar

Turkey burger with all the trimmings and Sweet Onion Salad
In a glass or ceramic bowl, mix all the ingredients for the marinade. Make sure the sugar is dissolved. 

Add the sliced onions and give it a good stir. Cover and set in the fridge. Let sit overnight if you can or at least 6 hours.

Once the onions have marinated, remove from marinade and drain well, using a colander.

Mix the mayonnaise and sour cream, then add the parsley. 

Fold in the onions, and you are ready to call in the clan.


Enjoy
Pair this meal with a British Columbia Hard Pressed Cider


Asian Vinaigrette

Asian Vinaigrette Salad Dressing


Here is another salad dressing that is really good.

Terra Delyssa Olive Oil
This recipe just like the "Basic Vinaigrette" came as an insert with my favourite olive oil. The oil is called Terra Delyssa and is made in Tunisia.

I have yet to find a better-tasting olive oil than this Terra Delyssa Organic Olive Oil.

I buy the Terra Delyssa olive oil at Costco. It comes in a two-pack, one litre each bottle and it is very affordable.

Recipe Ingredients:

  • 2½ tsp Terra Delyssa olive oil
  • 2¼ tsp soya sauce
  • 2¼ tsp rice vinegar
  • ½ tsp brown sugar
  • ½ tsp toasted sesame oil

Mix all the ingredients into a bowl or measuring cup (for easy pouring), whisk till all the brown sugar is dissolved. 

Use on your favourite Asian salad, also great as a dipping sauce.

Basic Vinaigrette

Quick And Tasty Vinaigrette


This recipe came as an insert with my favourite olive oil. It is called Terra Delyssa and is made in Tunisia. I have yet to find a better-tasting oil than this Terra Delyssa Organic Olive Oil.

The best place to purchase it here on Vancouver Island, BC is at Costco. It comes in a two-pack, one litre each bottle and it is very affordable.

Recipe Ingredients:

  • 2 tbsp Terra Delyssa olive oil
  • 1 ½ tbsp balsamic vinegar
  • 2 tsp Dijon mustard
  • 2 tsp of maple syrup or honey
  • salt to taste
  • pepper to taste

Add all the ingredients into and a small bowl or measuring cup, whisk together for a minute or so and you're done. 

Makes about ¼ cup or 60 ml. What you do not use, keep in the fridge. Serve on your favourite Salad.

If you are making an Asian salad, check out the Asian Vinaigrette.

Enjoy


Slow Cooked Lamb Shanks

Braised Lamb Shanks


Lamb shank with potato-carrot mash and baby peas
Comfort Food, plain and simple!

This dish is just so easy to make, yes it takes a bit of work, but still easy to make. It looks and tastes so incredible. The meat just falls off the bone.

Serve this dish with a potato-carrot mash and some baby peas.

I use a large cast-iron Dutch Oven for a small crowd or stainless steel roasting pan for a large gathering. For browning us a cast iron pot if you have.

This recipe is for 6 people

Recipe ingredients:

  • 6 lamb shanks, around 500 grams or 17 oz each
  • ½ - 1 cup of white flour
  • 6-8 tbs of canola oil (grapeseed oil, sunflower oil and safflower oil is OK) Add more oil if needed
  • 1½ cup of red wine (a good hearty red will do fine)
  • 2 medium onion, chopped
  • ½ a leek, chopped fine
  • 1 medium-sized potato, peeled and cubed
  • 800 ml of canned diced tomatoes. You can use whole canned tomatoes or tomato sauce if you do not have the diced ones.  Add the whole content of the can.
  • 3 carrot, sliced
  • 1 apple, peeled, cored and chopped
  • 2 cups of strongly flavoured beef bullion (I prefer "Better Than Bullion). Double up on the product that you use. The dissolved bullion should taste strong.
  • 4-5 cloves of garlic, minced
  • 3 fresh bay leaves. If you do not have fresh use dried
  • 1 whole sprig of fresh rosemary (about 6 inches or 15 cm long)
  • 1 tsp of minced fresh ginger
  • 2 tsp salt
  • 1 ½ tsp white pepper

Trim the lamb shanks if needed. In a cast iron dutch oven add the canola oil and heat to medium-high.

In a large zip lock bag, add the flour, salt and pepper and shake up really well. Now add one lamb shank at the time, shake it so it is nicely coated then set it into the hot pan.

 Brown the shanks well. They should be browned all the way around. This does not cook the meat, it just sears it so it keeps the flavour in. The important part here is to brown the shanks well. I brown one shank at the time and keep them warm in the oven or wrap in tinfoil. While browning I use a large spoon and baste the shanks. Since the shanks are very irregular it is hard to brown them all over, but by basting (pouring the oil with a large spoon) you can get them nicely browned. This takes some time, at least 10 minutes each.

Potato-carrot mash with slow-cooked lamb shank
Once finished browning the shanks, turn the heat down to medium and add the onions, carrots, leek. Saute till the onions are translucent. About 5 minutes. Add the ginger, garlic and apple to the pan and saute for another minute or two, making sure not to burn the garlic. Make sure to scrape after the bottom to get all the bits and pieces from the shanks loose, it will add fantastic flavour.

Add the beef stock, diced tomatoes, wine and the bay leaf stir and bring to boil. Taste the mixture and adjust salt, pepper and or beef bullion. Return the shanks to the pot and slow cook 4-6 hours turning the shanks every 30 minutes or so. Once the meat starts to almost fall of the bone, you're done.

The sauce that is leftover tastes fantastic. If not to your liking adjust with salt, white pepper, bullion or wine. Bring to boil and reduce to desired thickness.

I prefer to make this dish one or two days ahead of the actual dinner. Set the whole pot in a cold place, preferably the fridge. If you live in a tempered climate like we do, the balcony works well. Before returning back to the stove, make sure to remove all the fat. It is now in a nice layer on top and can be scraped off with a spoon.

Leftover wine, freeze in ice cube trays and use for cooking at your convenience.

Once cooked, remove the bay leaf and the rosemary sprig, serve with a potato-carrot mash and green baby peas.

Enjoy


Broccoli and Garlic Ensalada

Broccoli and Garlic Ensalada


Broccoli and Garlic Ensalada
This is a super easy recipe and you can eat this ensalada as a salad or as an appetizer. I prefer this as an appy with some homemade crackers.


As a small salad, this recipe is enough for 2 people. For an appy, you can stretch it to 4 people.


I got this recipe from my brother, well, almost, Tonny is my second cousin. Tonny and his wife Lillemor are both awesome cooks.

Recipe Ingredients:

  • 300 g of broccoli florets
  • 2 tbsp of lemon juice
  • 2tbsp of olive oil
  • 2 garlic cloves, sliced into slivers
  • 1 tsp of sea salt

Slice the garlic lengthwise into slivers

Chill the broccoli in ice water after it is blanched
Blanch the broccoli in boiling water for 2 minutes. Then cool quickly in ice water for about 5 minutes, drain in a colander and set aside.


Mix all the other ingredients into a dressing including the garlic, then toss with the broccoli florets. If this is to tart-tasting for you, add half a tsp of honey.

Enjoy,

Anders


Tinfoil Cooking now available on Amazon


Tinfoil Cooking; RV Cookbook


Tinfoil Cooking is the ultimate cookbook for the outdoors. Easy cooking for Camping, RV'ing, Boating and at home. Delicious meals with very few or NO DISHES! 

This book is for RV'ers, boaters, campers and at home. Easy to follow recipes that everyone can use.

Wow, it has been a fun journey getting this book up on Amazon. I sure have learned a lot about publishing. Not as easy as one might think.

Front cover of my book Tinfoil Cooking
Front Cover of Tinfoil Cooking


If you are looking to make your camping or boating trips a bit easier then this books is for you. 

Do you dread having a whole bunch of dishes to clean up when you are out camping or boating or even at home? Then this book is for you. Actually, it’s a silly question — of course, you do, no one wants to do dishes and clean up the big mess left behind when you cook up a big meal.

If you are like me and want to simplify the whole cooking process without sacrificing on flavour, then this book is for you.

If you like to cook up the tenderest ribs ever, then this book is for you?

If you like to make the best-tasting vegetables supercharged with flavour, then this book is for you.

If you like to cook up some pasta without a pot and without steaming up your whole camper or boat, then this book is for you. You can even cook the pasta over a campfire.

Back Cover of my Book Tinfoil Cooking
Back Cover of Tinfoil Cooking

Do you enjoy freshly baked artisan bread with your breakfast, lunch or dinner? No kneading required. Then this book is for you.

I truly hope you enjoy the recipes in this book so you can spend more time with family and friends and less time washing dishes.

My book hit the Amazon #1 Best Seller in outdoor cooking.
Amazon #1 Best Seller in outdoor cooking.


My book is available on Amazon in all countries that Amazon operates in. For ease of ordering, here are some links, Amazon.ca, Amazon.com, Amazon.de and Amazon.co.uk.  You can also search the book Tinfoil Cooking or my name Anders Treiberg on your favourite Amazon site. Please NOTE, you do not need an e-reader for the digital version, you can download a free app here.

Enjoy,

Anders

Ultimate Baked Potato and Potato Skin Pocket

Baked Potato and Potato Pocket


Serves 2 people
Cooking and preparation time 90 minutes

Baked Potato With Trimmings
A baked potato is real comfort food. It is amazing how many "ugly" baked potatoes people make and serve up.

Baking potatoes are very simple but please do not follow some of the restaurants out there who bake their potatoes in tinfoil.

My take on this is that many restaurants use tinfoil to keep the potatoes warm for a long time. If they did not use tinfoil, they would have to microwave the potato and that would be really ugly.

If you bake a potato in tinfoil, you get a potato that is very moist inside with an almost slimy texture. Do it the right way and you get a potato that is light and fluffy inside.

For a complete video check out my YouTube Channel.

To bake a potato properly, in my opinion, it will take at least one hour at medium-high heat. That’s around 375°F or 190°C give or take a few degrees.

First, start with the right potatoes. I prefer white or yellow flesh potato. They have nice thin skin, and the skin is so tasty when prepared right into a potato pocket. I will come to this later.

I do not use the “baker” potatoes. I think the skin is too rough and tough. However, if you like to use them, go ahead.

Ingredients:

  • 2 medium-large yellow-fleshed potatoes

Follow my steps below and serve up the ultimate baked potato:

Wash and remove any blemishes from the potatoes. It's OK to cut off a piece of the potato if it has a cut or blemish in it.

With a dinner fork, poke the potatoes about 5-6 times on each side, this is to let the moisture escape while they are cooking. If you do not do this, the potato may explode, and you have one heck of a mess. I talk from experience here.

Set the potatoes on the BBQ or in the oven. I prefer the BBQ; the heat somehow seems dryer and the skin cooks to perfection. If you have two or more burners on your BBQ, use indirect cooking. If you have an upper rack on the BBQ, use it.

If you bake the potato over the fire, build a little tent out of tinfoil to reflect the heat down. Over the fire, you have to keep a close eye on the heat source and turn the potato more often. If you have a cast iron pot, you can turn it upside down over the potatoes to keep the heat in.

Turn the potato over after 30 minutes

Baked Potato
Baked Potato
The best way is to time the potatoes, so they come off the BBQ directly to the plate. If the potato has to sit for a while, then cut a plus sign across the top and give it a squeeze. This is so the steam can escape and not make the potato wet and mushy inside.

If they have to sit for more than five minutes, then make sure they sit on a preheated plate to keep them warm.

OK, back to the skin. My favourite way of eating baked potatoes is like this. Cut the baked potato in half, crosswise, as soon as it comes off the BBQ and lands on your plate.

Then scoop out the potato flesh from both halves onto your plate. The skin is now empty and forms a little pocket. Put a little butter in each pocket, some salt, pepper and maybe some chopped green onions. Pinch the skin closed and set aside for at least 5 minutes.

In the meantime, add whatever you prefer to the potato flesh. Try some butter, sour cream, chives, green onions, bacon bits or cheese and you are set.

Once the potato skin has sat for at least 5 minutes or more, it is ready to be eaten. Just munch it up as it is. Be prepared that some of the butter may run out, so roll up your sleeves. Best potato skins ever!


Leftover Hubbard Squash Soup

Squash Soup


Leftover squash soup
When you cook up squash for lunch or dinner, I always bake the whole squash so I have some leftover to make soup on.

If you are using smaller squash, bake one or two extra. It does not take any extra energy to bake several at the time.

For this recipe, I used Hubbard squash. It is fairly easy to work with and the skin is not to tough to cut through.

Recipe ingredients:


  • 1 litre or 4 cups of water
  • Leftover Hubbard squash, cooked
  • ½ onion, chopped fine
  • 1 tbsp of butter
  • 2 tsp of turmeric
  • Salt to taste
  • Pepper to taste
  • 1 cub of bullion chicken or vegetable is good
  • 2 dollops of sour cream, optional
In a medium saucepan over medium heat melt the butter and add the chopped onions. Saute for 2-3 minutes. Add the water and dissolve the chicken bullion, add the squash and turmeric. Bring to boil.

Leftover squash soup with sausage
Add salt and pepper to taste. Simmer for 5-10 minutes. If you have some leftover sausage, chicken or ham, feel free to add. Serve with a dollop of sour cream.

Some crisp Wasa bread and Havarti cheese are definitely in order.

How to cut an Avocado

Cutting an Avocado


Two halves of Avocado
Cut Avocado
Cutting an avocado is really easy. It might look a bit intimidating but not to worry.


In the video below you will see how easy it is.


What you do is find yourself a nice ripe avocado and using a large knife (I find it easier with a larger knife) and cut all the way around the avocado, lengthwise.


After that, you twist the two sides in opposite direction and the avocado will come apart into two pieces.

Avocado and Tomato Salad
Now tap the pit with the sharp side of the knife and twist and the pit will come right out.

From here it depends what you will make with the avocado.

If you are making Guacamole or part of a salad like my Tomato and Avocado Salad, then use a dinner knife with a round end and slice into half an inch cuts lengthwise, being careful not to cut through the skin.

Do the same crosswise. Scoop out with a spoon.

If you are going to slice them thin, then scoop out each half and slice to your liking.

Here is the video.


Enjoy


BBQ'ed Prawns - Shrimp


Marinated Prawns on the BBQ


BBQ'ed Prawns with rice and coleslaw
BBQ'ed Prawns
Since I was born and raised on the Baltic Sea in Sweden, great seafood is very special to me.

I love fishing, prawning and crabbing where we live now. I even love fishing for crayfish.

Crayfish is a delicacy in my native country of Sweden.

I remember as a young child going out jigging for cod with my dad.

Just about always came back with a boat full of fish. I had to learn how to swim early because life jackets were nowhere to be found.

On with the recipe..... This recipe is very easy and anyone can cook these up.  Some people cook prawns in a basket but if you have good sized ones I prefer to cook them on a skewer. They cook more evenly that way.

A good set of Skewers is Worth Investing in.
If there is one thing that is worth buying and buying good ones is a good set of skewers with wood handles. The skewers should be flat so when you close up the BBQ they do not bind too much.

This recipe is for two people and the prawns will be the main course. If you cook them as a side to strip loin steak. then 3-4 is plenty.

Ingredients:
  • 20 large prawns
  • 3 tbs of Canola oil (Organic if you can get your hands on some)
  • 2-3 tbs of garlic seasoning. You can use any seasoning you prefer but it has to have lots of garlic in it.  Use more seasoning if you prefer. Just do not overdo it. Remember prawns are very delicate.
  • 1 medium lime

Garlic Seasoning
Garlic Seasoning
If the prawns are frozen, thaw them under running water. Put the prawns, in a medium-sized bowl and add the Canola oil.

Toss to coat all of the prawns well.  Now sprinkle the seasoning and toss again. Let sit for 1-2 hours and toss every 20 minutes or so.

Just as you are ready to thread the prawns on the skewers squeeze the lime over them and toss again.

At this point, it's time to turn your BBQ on.

Lay out a good size piece of tinfoil or wax paper. Spray the tinfoil with some Canola Oil cooking spray.


All your skewers should fit on the foil. Stick the skewer through the prawn. With large prawns like these, I prefer to stick the skewer through in two places.

This keeps the prawn nice on the skewer and it makes it easier to turn them. Try to even out big ones and small ones equally on each skewer.

Add Lime Just Before You Thread The Prawns on The Skewers.
Once you have them all threaded and your BBQ is up to heat, around 300-350°F it's time to set them on the BBQ.  

Stick The Skewer through the prawn in two places if they are large

Make Sure to Have Large And Small on All Skewers

Ready For The BBQ
Ready For The BBQ

The Neighbours Will Come And Ask What You Are Cooking up.

With Flat Skewers, The Lid Closes Nicely
You have to watch this closely, seafood cooks fast and prawns even more so. Depending on your BBQ it will take about 3-4 minutes on each side for a total of 7 to 8 minutes. You may want to add one extra prawn that you can sample. Should be cooked right through.

Cooked prawns on skewers
Serve Right Away.... So good!
Serve right away over rice, quinoa, or a Ceasar Salad.


Wine Recommendations:


A nice soft wine is in order.

Remeber you should savor the garlic and citrus flavour from the prawn.

Try Latitude 50 White from Gray Monk Winery in the Okanagan Valley, BC.

A great wine at a very affordable price.

Bon Appétit,

Anders


Left Over Rice on The BBQ


Left Over Rice Recipe


So while you are out RV'ing or boating and you have some leftover Rice. What do you do with it? This is a simple and easy way to cook it up and with no pots to clean afterward.

Here are the ingredients:

  • Leftover Rice   
  • 1 tbs of butter   
  • 3 tbs of water  
  • Canola Cooking Spray


Left Over Rice on the BBQ
Turn on your BBQ. Pre heat up to around 300F.

Cut off a good size piece of TinFoil, spray some Canola Cooking Spray on the tin foil, shiny side up.

Drop the rice in the center of the foil, add the butter on top.

Close-up almost all the way, but before closing up completely, pour in the water. Close completely.

After 15 - 20 min it's ready to eat, it will be better than when you first cooked it.

Just be careful when you first open the tinfoil up, it will be steaming hot.

Call the troops and scoop it out.

Bon Appetite,

Anders

TFC

Corn on The Cob on The BBQ


Corn on The Cob


Corn on the cob is such wonderful soul food. Can be eaten just about any time. Especially nice when you can get some local corn while out and about RV'ing.

When you are camping or boating boiling some water and cooking the corn steams up the whole place and makes another dirty pot.

Here is an easy and fun way to cook up some corn with very little fuzz.


Here are the ingredients: 
  • Corn on the cob with husk on it  
  • Half a cup of water

Two Cobs of Corn With The Husk on.
First turn your BBQ on and get it up to about 300F. Cut a large piece of Tinfoil, shiny side up and put the corn on it.

Fold up from the sides first then the top end. Before closing the bottom add the water and close the bottom end up tight.

Set the foil with the corn on the BBQ and come back in 20 min.

Once the 20 minutes are up, with some mitts on remove the corn and set on a heatproof surface.

After a minute or two, open up the tin foil carefully, it will be steaming hot. Pull back the husk from the top down and break the bottom end off if there is a piece sticking out.

Smother with butter and add some salt and pepper.

Bon Appetite

Anders

TFC

Whole Roast Chicken on The BBQ


Whole Roast Chicken Recipe


Roast Chicken on The BBQ
Roasting a chicken on the BBQ is one of the most satisfying things to cook.


Besides that, it tastes so good and it is easy.


While it cooks you can sit and sip on some wine while taking in the wonderful aromas from the BBQ.


I know you just can't wait to get started so I will not hold you back...


Here are the ingredients:

  • One Whole Chicken. Free range, organic or what ever you prefer.
  • 4-5 tbs of my Meat Rub #1

That's it. So here is what you do. Take the chicken out of the fridge and if it is not tied up with butcher twine, wrap a few loops around it. Just so it keeps together better once cooked.

Rub the chicken with my favourite Meat Rub #1 and make sure to completely cover it. Then return to the fridge for 1-2 hours.

Heat up your BBQ, pour yourself a glass of wine and make a nice tray from tinfoil. The chicken will cook on the tray and the tray will prevent a flare-up. You can, of course, buy a ready made tray if you wish.

Tray Made From Tin Foil

Chicken With Rub on it, Resting on The Tin Foil Tray

Spray the inside of the tray with some Canola Oil and set the chicken on the tray. Watch the chicken closely till you get the right temperature. Around 300°F is just right. On a small RV or Boat BBQ that will be the low setting more than likely.


Thermometer. Keep Temperature Around 300°F
Keep Temperature Around 300°F

If you do not have a manual valve on your gas line I would suggest installing one. This is very handy to cut down the flow of gas to your BBQ if the low setting is still too high.

Gas Line Valve on the BBQ
Gas Line Valve

If you have a personal size aluminum pizza plate. Put that under the tin foil to help with heat distribution. Not needed to go and buy one, only if you have one.


Probably The Best Chicken Ever
It will take about 1¾ - 2 hours to cook the chicken.


Turn he chicken about every 20 minutes using a large set of tongs.


Once cooked, remove the chicken from the BBQ and wrap in tin foil for about 10 -15 minutes.


Then serve with some coleslaw, rice or whatever you prefer.

Bon Appétit,

Anders


Easy Meat Rub #1


Meat Rub #1


This is a great meat rub that I mixed up. Works great on just about any kind of meat. Super good on Rotisserie Chicken and pork roasts. Can be kept in the cupboard for a long time.

Here is a tip, when rubbing the mixture on the chicken or roast, use a spoon to scoop it on the meat and latex gloves to rub it into the meat.

Let sit for two hours in the fridge with the rub on it before cooking.

Note, I use regular sugar instead of brown sugar that most rubs have. This makes the rub easier to keep and it does not cake up.

Ingredients are as follows:
  • ¼ cup of Sugar
  • ¼ cup of Paprika
  • ¼ cup of Lawry's Seasoning Salt
  • 1 tbsp of Garlic Powder
That's it. Mix well and keep in a zip lock bag.  

Cheers,

Anders

Making Bacon


Bacon The Easy Way


Thick Cut Bacon on the BBQ.
Thick Cut Bacon on the BBQ. 
Bacon is a staple we use a lot in our household. It is a bit messy to prepare but I have a way around that.


First I'm really picky about what bacon I buy.


My bacon of choice is a thick cut bacon like Harvest Bacon from Saskatchewan.  Make sure to use thick cut bacon. It is far superior and much easier to handle.

Also check with your local butcher to see what they have or what they can order in. I'm all for supporting the local business if at all possible.

Buy the bacon when on sale or make a deal with your butcher.  I usually buy 4-6 kg or 9-13 lbs when there is a sale. The local butcher will more then likely give you a deal if you buy larger quantities, just ask for a discount.

Wood chip puck almost used up, smoldering on the BBQ.
Wood Chip Puck Almost Used Up.
Then what I do, is using a cookie sheet lined with heavy foil. I fire up the BBQ up and cook the bacon on it.

This way it does not mess up the kitchen and eliminates the bacon flavour lingering in to your bedroom.


A beer and some music makes this job a breeze.

Often for extra flavour I put a Bradley wood chip puck on the grill to get that extra little bit of smokey flavour. It will just sit there smoke away. This is optional.

As your bacon cooks (the lid on the BBQ should be closed) and is to your liking remove it and set aside on some paper towel to absorb some of the fat drippings. Once the bacon has cooled, place in zip lock bags or in bags for shrink wrapping.

Cooked Thick Cut Bacon
The beauty with zip lock bags is that you can just take out 2-3 bacon strips and close it back up again.

It does not really matter how many strips you put in each bag, but I prefer to use smaller bags and about 10-15 strips in each bag. Then transfer to the freezer.

That's it, you are ready to make Eggs Benny in the morning, make Egg Salad Sandwiches with chopped bacon.

Having bacon ready and cooked like this is also very handy for camping. When we go RV'ing we always keep a bunch in the freezer.

You will now have a bunch of bacon fat left over. Let it cool for 15-30 minutes then take a glass jar with a tight fitting lid and scoop up the bacon fat in to the jar using a spoon. Be careful it is hot. Let cool and then stick it in the fridge. We have kept ours for months.

This bacon fat is excellent for frying up Rösti, onions or just about anything you want to add some extra flavour to.

Enjoy,

Anders


Poached Bratwurst in Beer


Poached Bratwurst in Beer


Poached Bratwurst in Beer with Gnocchis and Cambozola Sauce
Poached Bratwurst in Beer
This is a super easy recipe that takes very little prep work.

To poach the bratwurst takes about 20-30 minutes. It tastes fantastic, and can be served in many ways, on a bun with trimmings, with Rösti potatoes, with gnocchi or ...... you figure it out.

This recipe is for four people.

Ingredients:
  • 1 tbs of Canola Oil or Butter
  • 2 large onions
  • 1 can / bottle of beer (355 ml)  A darker beer is preferred but not necessary, any kind will do.
  • 4 bratwurst. Go to the local butcher and pick out some special ones.


In a large frying pan, add the canola oil, medium heat. Cut onions in half, length wise. Then slice thin.

Add onions, covering the bottom of the pan and toss in the canola oil for about one - two minutes. Lay the bratwurst on top of the bed of onions and add the beer.

Poached Bratwurst in Beer With Gnocchis in Cambozola Sauce
Let simmer over medium heat. Turn the bratwurst every 5 minutes so it cooks from two sides.

Simmer till all the beer is gone. Your done! The onions will be the best onions you ever made!


If you serve the bratwurst on a bun, cut them in half, length wise, add onions and your in heaven.

For the meal I made today I choose to cook some Gnocchi's in Cambozola Sauce to accompany the brats.  This evening though, I did not have any Cambozola so I just added extra Parmigiano as well as some sun dried tomatoes. Anything really goes here.


Wine Pairing:


Black Box Wine  Cabernet Sauvignon
Black Box Wine  Cabernet Sauvignon
You can't really go wrong with any red wine here. Many people prefer and beer or a cider but with our meal I went with a very affordable red wine.

The Black Box Wines..... I know all you wine snobs out there will wrinkle your nose to a boxed wine.  Many people wrinkled their noses at twist off caps as well and they are now very common.

For this meal we used a Cabernet Sauvignon from Chile. This boxed wine is fantastic for the money and the beauty is that once you open the box, it stays fresh for 6 weeks. There are four 750 ml bottles in one box.

For people like ourselves that do a lot of RV'ing and for boaters, these fine boxed wines are so easy to take along. Less weight and space.

Kiss the cook,

Anders


Easy Raspberry Sorbet Recipe

Raspberry Sorbet


Raspberry Sorbet
Raspberry Sorbet
This is a very easy recipe and it tastes fantastic. Serve this on its own or with a thin Florentine style cookie or an Almond Biscotti.

Ingredients:
  • 3 cups / 700 ml of frozen Raspberries or any other berry or fruit.
  • ¼ cup / 60 ml of ice
  • 1/4 cup / 60 ml of Agave or Maple Syrup
  • Juice of half a lemon

All The Ingredients added to The Blender
Add All The Ingredients to The Blender
Add all the ingredients to a blender mix till it has a nice smooth consistency. 

Using a soft spatula scoop out the sorbet in to a container and serve or keep in the freezer for up to two weeks. 

Prior to serving your sorbet, remove it from the freezer for about 5 minutes to soften up a bit. 

Use ice cream scoop when serving. One scoop per person is plenty for a nice dessert.

Kiss the cook,

Anders


Basic Soup Recipe

Easy Soup Recipe


Bowl of soup
Basic Soup Recipe
This is my basic soup recipe, and it is super easy to do.

If at all possible, I prefer to make a soup on home made soup stock from chicken or a ham bone. This is not always available, so then I use Knorr Bouillon.

A soup can be made on just about any leftovers, from gravy, vegetables, cooked potatoes, meat, then throw a can of corn in there.... you name it, it can all go in there.

This recipe is super easy and anyone can do it. This easy soup is really good on a cold rainy day. This is for two people.

Ingredients:

  • 1 liter or 1 quart of cold water
  • 1 Knorr Vegetable cube of bouillon
  • 1 Knorr Chicken cube of bouillon
  • 1-3 green onions or shallots, finely chopped
  • 1-2 shredded carrots

Vegetable Bouillon cubes
Vegetable Bouillon Cubes

Chicken Bouillon Cubes

Chopped Carrots and Green Onions
Bring water to boil in a medium size sauce pan. While it is starting to warm up break up the boullion and add while stirring with a whisk. 


Once it boils, let it simmer a few minutes, then add the onions and carrots. Then simmer two more minutes. 


Serve with some Swedish Wasa Bread and some Havarti Cheese. You can of course use any bread you like.


That's it. So simple. Just keep in mind you can use whatever you have in the fridge. If you had a stir fry the day before, just use the leftovers in the easy soup... Yum!

Kiss the cook,

Anders