google.com, pub-1183232341631896, DIRECT, f08c47fec0942fa0 Anders Cooks: Supper / Dinner

Sign Up For My Second Book

Purchase a coil bound luxury copy of my first book "Tinfoil Cooking" right here on my website. This book is printed on 80# stock and lays flat on your counter when open. You can also purchase a paperback version or an E-Book version on Amazon.ca or on Amazon.com. The book is also available all over the world on the Amazon platforms. My second cookbook is coming soon, stay tuned.
Showing posts with label Supper / Dinner. Show all posts

Poached Cold Salmon With Dill Sauce - Inkokt Lax Med Dillsås

 Perfect Summer Salmon Dish


Poached Salmon the Swedish Way

This dish goes back to my roots in Sweden and I prefer to make it a day in advance. It really gets better as it sits.


Poached salmon is very common in Sweden and especially in the summer served up with fresh baby potatoes for lunch or supper. I think this dish should be paired with a nice beer (Lager). The beer should not be "hoppy", rather light and crisp. Corona is a perfect match. You can also serve this as an appetizer or part of a group of appetizers. 

Regarding the ingredients, you don't have to be too exact, the main thing is that the salmon is covered with broth. 

Ingredients:

  • 500-700 grams of salmon of your choice. Sockey is really yummy but any salmon is fine.


Ingredients for this recipe (broth):

  • 50 ml of white wine vinegar
  • 300 ml of cold water
  • 50 ml of sugar
  • 1 tbsp of salt
  • 1 red onion, thinly sliced
  • 1 carrot, sliced
  • 10 white peppercorns (black is OK, but increase to 15)
  • 1 large bay leaf
  • 5 fresh dill branches (halved)

Ingredients for the Dill Sauce:

  • 3/4 cup of mayonnaise (I prefer Hellman's made with olive oil)
  • 1/4 cup of organic sour cream (buy the best you can get your hands on)
  • 2 tbsp of fresh chopped dill
  • A squeeze of lemon (optional)

Poached Salmon

Poached Salmon and Dill Sauce

Dill Sauce

To start with, prepare the salmon, remove skin, bones and trim nicely. Use a set of needle-nose plyers to remove the pin bones. 


Make sure to do a good job here, nothing worse than having to sit and pick out a bunch of bones. Cut into 1-inch cubes.


In a small to medium-sized saucepan mix all the "broth" ingredients and bring to a boil. Let simmer for 5-10 min. While it is simmering, mix together the Dill sauce. Cover and set in the fridge.


Once the 5-10 minutes are up, add the salmon cubes, the broth should cover the salmon. If it does not, add a bit more, water, vinegar, sugar and salt. Simmer for 3-5 minutes max. 


Remove from heat and let it cool slowly on the counter. Once it is cool, set it in the fridge. The salmon should be served cold right out of the pot with onions and carrots.


Serve this dish with freshly boiled baby potatoes (skin on). The potatoes should be boiled with lots of fresh dill.


Rotisserie Chicken

Best Rotisserie Chicken

Serves 6 people
Cooking and preparation time 2 hours

Rotisserie Chicken on the BBQ
Rotisserie chicken is so good and it is fairly easy to make. You do need a Rotisserie on your BBQ.

If you plan to purchase a rotisserie, buy a good one. It pays in the long run.

I have a video on my YouTube Channel that shows this in detail.


Ingredients:

  • 2 whole chickens
  • 2 apples
  • 2 lemons
  • # 1 meat rub, or any other rub

Clean and wash the chickens and remove any inners. Quarter the apples and lemons and try to stuff the chickens full with 1 apple and 1 lemon in each chicken. Tie the chicken so the wings and the legs will not come loose.

Rub the chicken with my #1 meat rub. Then insert the rotisserie forks and shaft. Cook the chickens for about 1 hour. 

Check with a meat thermometer after one hour. Inside temperature should be over 72°C or 160°F. For the dark meat go a bit higher.

Let the chicken rest under some foil for about 10 minutes before cutting.

Creamed Spinach With Turkey Cutlets

Turkey Cutlets With Spinach in Bechamel Sauce


Serves 2 people
Cooking and preparation time 40-50 min

Spinach in Bechamel Sauce and Turkey Cutlets
Yummy! This is such a great tasting dish and I just love cooking this up. Spinach is such a healthy vegetable.

Spinach is loaded with vitamins, minerals and plant compounds. It is good for your eyes, helps control blood pressure and even has cancer-fighting properties. Eat as much as you can.

The cream sauce or Bechamel sauce is easy to make, just have to keep after the bottom of the pan so it does not burn.

Next, the cutlets. Ask your butcher for mechanically tenderized cutlets from turkey breast. Turkey breast, without the skin, is very high in protein and it is really good for people with high cholesterol and it can also play a roll in fighting cancer.

Ingredients for the spinach:


  • 220 grams or 7.75 oz of fresh spinach
  • 200 ml or 0.85 cups of water
  • ½ tsp of Kosher salt
  • 10 spears of asparagus, optional

Ingredients for the cream or Bechamel sauce:


  • 1.5 tbsp of butter
  • 1.5 tbsp of flour. I prefer gravy flour here. It does not lump up like regular flour.
  • 200 ml or 0.85 cups of milk, half & half or cream. Either one will work. I like half & half best
  • Salt to taste
  • White pepper to taste
  • Nutmeg to taste. Freshly ground. It takes very little, like a pinch. Using the extra fine grate on a tower shredder works well

The asparagus goes nicely on top
In a large saucepan add the water and salt, bring to boil. Add the spinach and stir and toss for about 1-2 minutes. As soon as it is cooked down and turned dark green, remove from heat and dump into a colander. Rinse with cold water until cool to touch. Set to the side and let it drain.

In a medium saucepan melt the butter over medium heat, sprinkle the flower in while stirring with a whisk. It will thicken up. Let it putter away for a minute then slowly add while stirring the half & half. If the mixture is still too thick add some more half & half. The consistency should be a bit thicker than gravy. Let the sauce simmer over low to medium heat for 5-10 minutes stirring every so often.

While the sauce is simmering, add the spices to taste. Once the sauce is almost ready, add the spinach and give it a good stir.

Ingredients for the cutlets:


  • 2 turkey cutlets for turkey breast, mechanically tenderized. About 100 grams or 3.5 oz for each person
  • White flour
  • 1 egg, whipped in a small bowl, cereal size bowl.
  • Bread Crumbs
  • ½ tsp of kosher salt
  • ¼ tsp of white pepper
  • 3 tbsp of butter

From left to right, bread crumbs, whipped egg and flour
In a bowl whip the egg with a fork and set aside. On a salad plate, add a ⅛ inch or 4 mm layer of flour mixed with salt and pepper. On a second plate add the same amount of breadcrumbs.

In a large frying pan melt the butter over medium heat. Line up the flour, egg and bread crumbs in that order from right to left. Using a fork take one cutlet and lay it in the flour, tossing it so it is covered all over. Then, dunk it in the egg. Again make sure it is covered all over. Next, chuck it into the breadcrumbs and roll it around so it is nicely breaded.

Next step, you guessed it, into the hot butter it goes. Fry approximately 5-7 minutes on each side. The cutlet should be medium-firm when you press down on it. Do not cut into the cutlet, rather use an instant-read thermometer. Cooked turkey is 165°F or 74°C. If time permits, baste the cutlets with melted butter from the pan as they fry.

Please make sure not to overcook the cutlet. They go from delicate meat to shoe leather very quickly.

While the cutlets are cooking, Peel and steam the asparagus. They will steam fast, 2-3 minutes, again don't overcook, a bit crunchy is good.

Enjoy.

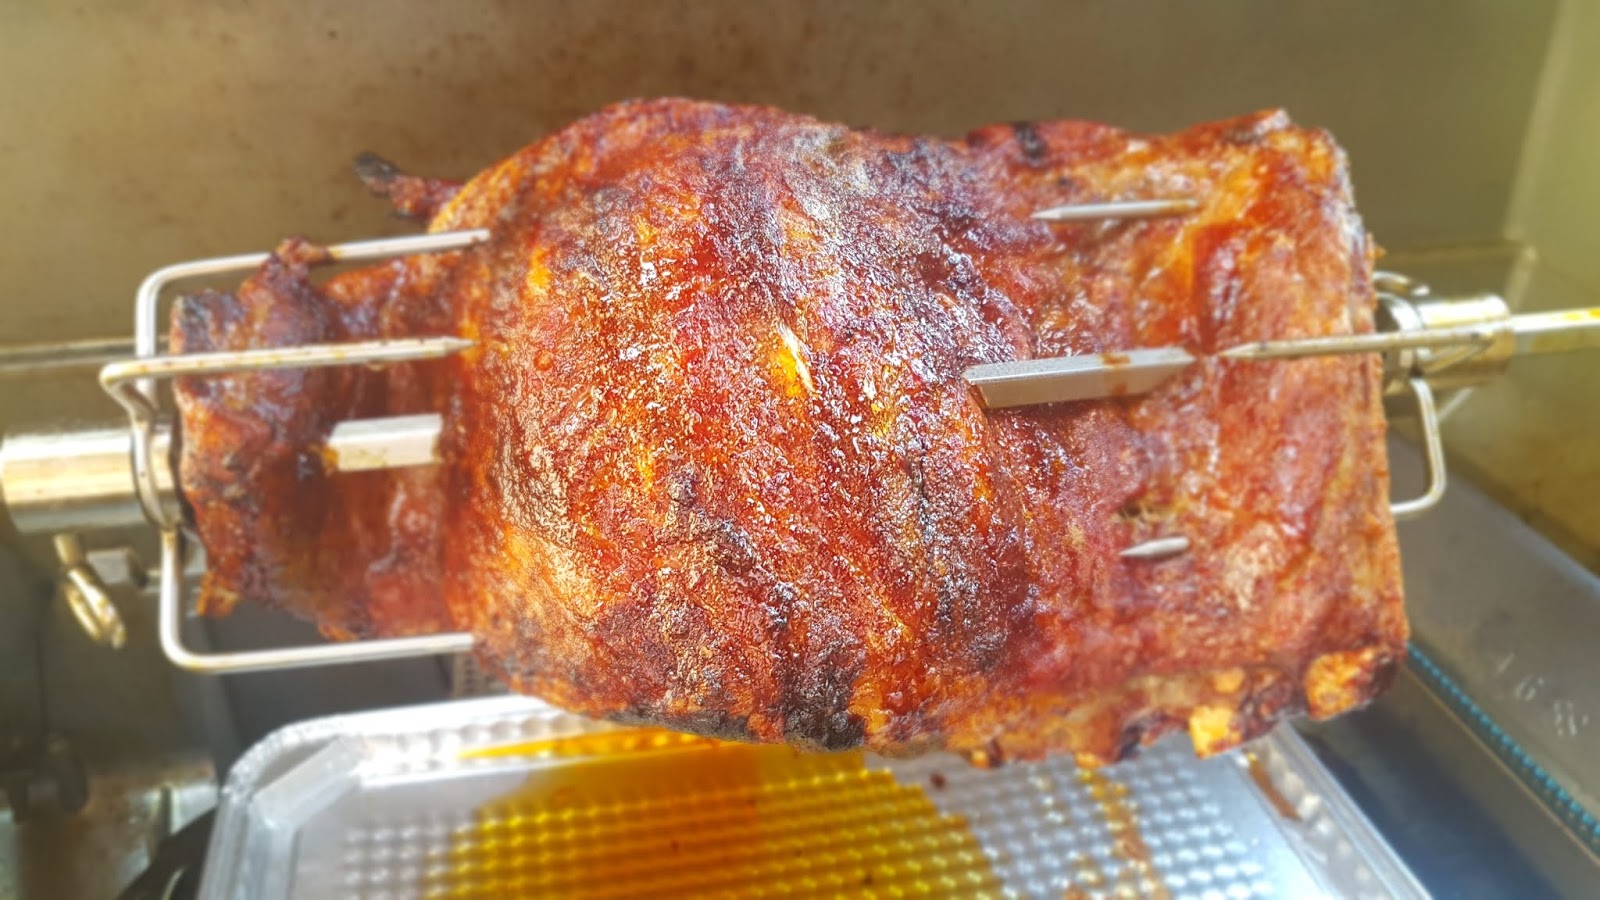
Summer Whole Spare Ribs on The Rotisserie

Whole Rotisserie Spare Ribs


Rotisserie Spare Ribs
A BBQ on a warm summer evening with a chilled bottle of Rosé is about as good as it gets.

Top this with a whole rack of spare ribs on the rotisserie and your as close to heaven as you can get. BBQ'ing spare ribs on the rotisserie make the ribs taste just wonderful with a nice crisp crust.

This recipe may look hard from the outset but trust me it is as easy as pie.

Ingredients for 3-4 people:

  • 1 whole rack of spare ribs. If you can only find the cut up ones, ask your butcher for a whole rack, uncut
  • Meat Rub #1. See my recipe.
First, remove the fine skin on the ribs. Use a blunt dinner knife and on the inside or cup side, stick it under the skin. Then with a sheet of paper towel, grab the skin and pull it off. The meat rub will penetrate the meat way better and it is much nicer to eat once cooked.


Rub the rack with my Meat Rub #1. If you can let it sit in the fridge for 3 hours that's awesome, if not, just stick it on the rotisserie. Be careful, the prongs are sharp.

Remove Skin from rib
Remove Skin from the rib

Remove the grill rack in the center and maybe even the flare plates and set a tinfoil plate to collect the drippings.

BBQ the ribs at around 325 - 350 F or 160 - 175 C for about 1.5 hours.

Let them rest on a cutting board for about 3-5 minutes. Do not cover with foil or anything. Cut and serve.

Try a nice potato salad and a side of beet salad. Just so good.


Swedish Lufsa Recipe

Basic Swedish Lufsa Recipe


Serves 3-4 people
Cooking and preparation time 90 minutes

Peeled potatoes ready to be grated.
Potatoes ready to be grated.

Final Step is to cover with thick sliced bacon.
Soul food! Lufsa is just that, soul food. A fantastic one pot meal that you can eat for lunch or dinner.


This is so easy to make and the troops will come asking for more. If you have a large crowd, just double the recipe.


I believe this recipe originated on the Island of Öland.


My parents use to have a summer home on that Island many years ago.

Ingredients:


  • 750 grams or 1.6 lbs of Potatoes, peeled and shredded fine
  • 250 ml or 8.5 oz of Half and Half. You can use half milk and half cream
  • 1 Egg
  • ½ tsp of Salt
  • ⅛ tsp of ground White Pepper
  • 300 gram of thick cut Bacon

In a medium-sized bowl beat the egg, half and half, salt and pepper together.  Grate the potatoes on fine. Squeeze out some of the water out of the grated potatoes. Mix the grated potatoes into the egg mixture. Scoop the mixture into a pre-made tin foil pan. Top with bacon.


Bake on BBQ, over the fire or in the oven on medium-high at 225 C or 437 F. Bake for 1 hour.

There are many variations of this recipe. Some people would add 200 ml of flour to the above recipe whisked in with the half and half. Finely shredded onion can also be added and maybe a few dollops of butter on top. Let me know what you come up with.


Carpaccio - Swedish Style

Swedish Style Carpaccio


This is another recipe I got from my cousin Tonny and his wife Lillemor. Thanks guys, I just love this dish.

If you have an issue with raw meat, then this recipe is not for you, guaranteed. Go to my next recipe.

Ingredients:

  • 1 Whole Beef Tenderloin. Trimmed and frozen for two days. Thaw out in the fridge overnight.

Ingredients for Marinade:

  • 75 ml or 2.5 oz of Salt
  • 75 ml or 2.5 oz of Sugar
  • 1 Tbsp of Coarsely Ground Pepper
  • 50 ml or 1.7 oz of Cognac (yum)
  • 1 tbsp of Organic Canola Oil

Make sure the tenderloin is nicely trimmed, no fat or sinew visible. Mix all the ingredients for the marinade in a bowl. Then rub in all over the tenderloin.

Set the tenderloin in a zip lock bag, remove as much air as possible from the bag and set on a plate in the fridge. Turn every 3-4 hours or so. The salt and sugar should completely dissolve and form a brine.

When you are ready to serve, remove the meat and scrap off the pepper gently. With a super sharp knife, slice as thin as you can and serve.

With this dish, you must have some Swedish Nobis Sås. Just fantastic. Serve up with some butter lettuce, tomatoes, bell peppers and some kind of potatoes. Pan fried is good.


Tin Foil Grilled Pork Loin Steaks


Tin Foil Grilled Pork Loin Steaks


Pork Loin Steaks on Tin Foil
This is a great and easy recipe. The main thing here is not to overcook the pork.

Pork steaks have a tendency to dry out. This is why I use tin foil and buy thick steaks. You can do these steaks directly on the grill but they will dry out a bit.

You have to keep a good eye on the steaks when cooking.

I just about always go by feel and you should practice that at all times. More on this below.

Ingredients for two people:

  • 2 pork loins, about 1 ½ inch thick or 3.75 cm
  • 2 tbsp of salted butter
  • Montreal Chicken Spice

Here is a tip to follow when grilling steaks of any kind of meat, chicken breast, lamb and more. Press down with the tongs on the meat after you turn the meat, it will be soft, as it cooks it firms up. Keep checking. As you practice this you will get good at it and you will know from experience when your steak is cooked. Further, always time your meat. The time you cook it the first time will give you a good guideline for next time.

Pork Loin Steaks on the BBQ.
The timing is different for everyone since most BBQ, Oven and the coals on the fire all work differently. Do not cut into the meat. All the wonderful juice inside runs out.

An instant read thermometer is OK, but have faith in yourself, you can do this by feel.

It also helps to have a little cooking notebook to write any pertinent comments. I use a binder with loose leaves.

In my opinion, the pork loin should only be cooked to a maximum of medium or 160 F or a bit pink inside.

This way you have a very tender and juicy steak. Remove the meat prior to reaching your desired cooking temperature since it will continue to cook when resting.

If you want to go even further you can brine the loin in salt water for a few hours. I do that with a pork roast and not usually with a steak.

Make a small cookie sheet out of foil about twice the size of the steak. Set on the BBQ or over the fire on low heat, add two tbsp of butter and let it melt.

Make sure not to overcook pork loin steaks.
While the butter is melting, dry the loin steaks off with a paper towel, sprinkle with “Montreal Chicken Spice” all over, yes, Montreal Chicken Spice goes very well on pork. One of my favourites.

Set the steaks in the melted butter. Now, depending you your BBQ cook away on the slow side, it should fizz a bit. I prefer to turn the heat up at the end. After about 7-10 minutes you will have to turn the steak. This is the point when you will start to check for firmness.

Once the meat is cooked, set it on some tin foil and wrap up to let it rest at least 10 minutes. The meat at this point will continue to cook a bit more. After 10 minutes or more the meat is ready and in the tin foil there will be some wonderful tasting “resting juice” to pour over the steak, rice, potatoes or…

Bon appetite,

Anders

BBQ'ed Prawns - Shrimp


Marinated Prawns on the BBQ


BBQ'ed Prawns with rice and coleslaw
BBQ'ed Prawns
Since I was born and raised on the Baltic Sea in Sweden, great seafood is very special to me.

I love fishing, prawning and crabbing where we live now. I even love fishing for crayfish.

Crayfish is a delicacy in my native country of Sweden.

I remember as a young child going out jigging for cod with my dad.

Just about always came back with a boat full of fish. I had to learn how to swim early because life jackets were nowhere to be found.

On with the recipe..... This recipe is very easy and anyone can cook these up.  Some people cook prawns in a basket but if you have good sized ones I prefer to cook them on a skewer. They cook more evenly that way.

A good set of Skewers is Worth Investing in.
If there is one thing that is worth buying and buying good ones is a good set of skewers with wood handles. The skewers should be flat so when you close up the BBQ they do not bind too much.

This recipe is for two people and the prawns will be the main course. If you cook them as a side to strip loin steak. then 3-4 is plenty.

Ingredients:
  • 20 large prawns
  • 3 tbs of Canola oil (Organic if you can get your hands on some)
  • 2-3 tbs of garlic seasoning. You can use any seasoning you prefer but it has to have lots of garlic in it.  Use more seasoning if you prefer. Just do not overdo it. Remember prawns are very delicate.
  • 1 medium lime

Garlic Seasoning
Garlic Seasoning
If the prawns are frozen, thaw them under running water. Put the prawns, in a medium-sized bowl and add the Canola oil.

Toss to coat all of the prawns well.  Now sprinkle the seasoning and toss again. Let sit for 1-2 hours and toss every 20 minutes or so.

Just as you are ready to thread the prawns on the skewers squeeze the lime over them and toss again.

At this point, it's time to turn your BBQ on.

Lay out a good size piece of tinfoil or wax paper. Spray the tinfoil with some Canola Oil cooking spray.


All your skewers should fit on the foil. Stick the skewer through the prawn. With large prawns like these, I prefer to stick the skewer through in two places.

This keeps the prawn nice on the skewer and it makes it easier to turn them. Try to even out big ones and small ones equally on each skewer.

Add Lime Just Before You Thread The Prawns on The Skewers.
Once you have them all threaded and your BBQ is up to heat, around 300-350°F it's time to set them on the BBQ.  

Stick The Skewer through the prawn in two places if they are large

Make Sure to Have Large And Small on All Skewers

Ready For The BBQ
Ready For The BBQ

The Neighbours Will Come And Ask What You Are Cooking up.

With Flat Skewers, The Lid Closes Nicely
You have to watch this closely, seafood cooks fast and prawns even more so. Depending on your BBQ it will take about 3-4 minutes on each side for a total of 7 to 8 minutes. You may want to add one extra prawn that you can sample. Should be cooked right through.

Cooked prawns on skewers
Serve Right Away.... So good!
Serve right away over rice, quinoa, or a Ceasar Salad.


Wine Recommendations:


A nice soft wine is in order.

Remeber you should savor the garlic and citrus flavour from the prawn.

Try Latitude 50 White from Gray Monk Winery in the Okanagan Valley, BC.

A great wine at a very affordable price.

Bon Appétit,

Anders


Left Over Rice on The BBQ


Left Over Rice Recipe


So while you are out RV'ing or boating and you have some leftover Rice. What do you do with it? This is a simple and easy way to cook it up and with no pots to clean afterward.

Here are the ingredients:

  • Leftover Rice   
  • 1 tbs of butter   
  • 3 tbs of water  
  • Canola Cooking Spray


Left Over Rice on the BBQ
Turn on your BBQ. Pre heat up to around 300F.

Cut off a good size piece of TinFoil, spray some Canola Cooking Spray on the tin foil, shiny side up.

Drop the rice in the center of the foil, add the butter on top.

Close-up almost all the way, but before closing up completely, pour in the water. Close completely.

After 15 - 20 min it's ready to eat, it will be better than when you first cooked it.

Just be careful when you first open the tinfoil up, it will be steaming hot.

Call the troops and scoop it out.

Bon Appetite,

Anders

TFC

Corn on The Cob on The BBQ


Corn on The Cob


Corn on the cob is such wonderful soul food. Can be eaten just about any time. Especially nice when you can get some local corn while out and about RV'ing.

When you are camping or boating boiling some water and cooking the corn steams up the whole place and makes another dirty pot.

Here is an easy and fun way to cook up some corn with very little fuzz.


Here are the ingredients: 
  • Corn on the cob with husk on it  
  • Half a cup of water

Two Cobs of Corn With The Husk on.
First turn your BBQ on and get it up to about 300F. Cut a large piece of Tinfoil, shiny side up and put the corn on it.

Fold up from the sides first then the top end. Before closing the bottom add the water and close the bottom end up tight.

Set the foil with the corn on the BBQ and come back in 20 min.

Once the 20 minutes are up, with some mitts on remove the corn and set on a heatproof surface.

After a minute or two, open up the tin foil carefully, it will be steaming hot. Pull back the husk from the top down and break the bottom end off if there is a piece sticking out.

Smother with butter and add some salt and pepper.

Bon Appetite

Anders

TFC

Whole Roast Chicken on The BBQ


Whole Roast Chicken Recipe


Roast Chicken on The BBQ
Roasting a chicken on the BBQ is one of the most satisfying things to cook.


Besides that, it tastes so good and it is easy.


While it cooks you can sit and sip on some wine while taking in the wonderful aromas from the BBQ.


I know you just can't wait to get started so I will not hold you back...


Here are the ingredients:

  • One Whole Chicken. Free range, organic or what ever you prefer.
  • 4-5 tbs of my Meat Rub #1

That's it. So here is what you do. Take the chicken out of the fridge and if it is not tied up with butcher twine, wrap a few loops around it. Just so it keeps together better once cooked.

Rub the chicken with my favourite Meat Rub #1 and make sure to completely cover it. Then return to the fridge for 1-2 hours.

Heat up your BBQ, pour yourself a glass of wine and make a nice tray from tinfoil. The chicken will cook on the tray and the tray will prevent a flare-up. You can, of course, buy a ready made tray if you wish.

Tray Made From Tin Foil

Chicken With Rub on it, Resting on The Tin Foil Tray

Spray the inside of the tray with some Canola Oil and set the chicken on the tray. Watch the chicken closely till you get the right temperature. Around 300°F is just right. On a small RV or Boat BBQ that will be the low setting more than likely.


Thermometer. Keep Temperature Around 300°F
Keep Temperature Around 300°F

If you do not have a manual valve on your gas line I would suggest installing one. This is very handy to cut down the flow of gas to your BBQ if the low setting is still too high.

Gas Line Valve on the BBQ
Gas Line Valve

If you have a personal size aluminum pizza plate. Put that under the tin foil to help with heat distribution. Not needed to go and buy one, only if you have one.


Probably The Best Chicken Ever
It will take about 1¾ - 2 hours to cook the chicken.


Turn he chicken about every 20 minutes using a large set of tongs.


Once cooked, remove the chicken from the BBQ and wrap in tin foil for about 10 -15 minutes.


Then serve with some coleslaw, rice or whatever you prefer.

Bon Appétit,

Anders


Creamy Tomato Sauce With Shrimp


Shrimp in a Creamy Tomato Sauce


This is a super easy recipe to use up some left over Rice, Quinoa, Pasta or..... what ever else is left in the fridge.  This recipe is for 3-4 people.

The ingredients are as follows:

  • 35-40 medium size Raw Shrimp without the shell. If frozen, thaw first under running water.
  • 1 can 796 ml of Crushed Tomatoes.
  • 4 or more cloves of fresh minced Garlic. You can add a lot of garlic in this recipe so don't be shy.
  • 3 tbs of canola oil (use the best you can afford, like organic)
  • 3 tbs of butter
  • 60 ml / 1/4 cup of whipping cream
  • 2 tbs of honey
  • 1 tsp of Turmeric
  • Salt to taste
  • Pepper to taste

In a large frying pan add the Canola oil and butter and let come up to heat. Depending on the size of your frying pan you may have to add some more oil and or butter.

Add the garlic and sautee over medium heat.  Stir often with a whisk to get all the flavour into the oil and butter mixture.

Add the shrimp and cook about 1-2 minutes on each side. Make sure not to over cook, rather on the other way.

Once the shrimp is cooked, remove into a bowl and set aside. Add the can of crushed tomato and bring to boil and then cook over medium heat till reduced to half. 

During the cooking time add the honey, turmeric, salt and pepper.  Adjust so it tastes nice and rounded, not acidic.

Once you have it tasting as you like, and the sauce is reduced by half, add the whipping cream. Stir in with the whisk and taste. Should be a nice creamy tomato flavour with lots of garlic lingering on the palate.

Remove from heat, add the shrimp and give it a good stir. Let sit for a minute or two and serve over left over pasta, quinoa or rice. Yum!

Wine Recommendation:


A Rosé wine goes nicely here like Oyster Bay Rosé from New Zeland. Or crack open a can of Apple Cider like Broken Ladder Apple Cider from British Columbia.

Bon appétite,

Anders


Poached Bratwurst in Beer


Poached Bratwurst in Beer


Poached Bratwurst in Beer with Gnocchis and Cambozola Sauce
Poached Bratwurst in Beer
This is a super easy recipe that takes very little prep work.

To poach the bratwurst takes about 20-30 minutes. It tastes fantastic, and can be served in many ways, on a bun with trimmings, with Rösti potatoes, with gnocchi or ...... you figure it out.

This recipe is for four people.

Ingredients:
  • 1 tbs of Canola Oil or Butter
  • 2 large onions
  • 1 can / bottle of beer (355 ml)  A darker beer is preferred but not necessary, any kind will do.
  • 4 bratwurst. Go to the local butcher and pick out some special ones.


In a large frying pan, add the canola oil, medium heat. Cut onions in half, length wise. Then slice thin.

Add onions, covering the bottom of the pan and toss in the canola oil for about one - two minutes. Lay the bratwurst on top of the bed of onions and add the beer.

Poached Bratwurst in Beer With Gnocchis in Cambozola Sauce
Let simmer over medium heat. Turn the bratwurst every 5 minutes so it cooks from two sides.

Simmer till all the beer is gone. Your done! The onions will be the best onions you ever made!


If you serve the bratwurst on a bun, cut them in half, length wise, add onions and your in heaven.

For the meal I made today I choose to cook some Gnocchi's in Cambozola Sauce to accompany the brats.  This evening though, I did not have any Cambozola so I just added extra Parmigiano as well as some sun dried tomatoes. Anything really goes here.


Wine Pairing:


Black Box Wine  Cabernet Sauvignon
Black Box Wine  Cabernet Sauvignon
You can't really go wrong with any red wine here. Many people prefer and beer or a cider but with our meal I went with a very affordable red wine.

The Black Box Wines..... I know all you wine snobs out there will wrinkle your nose to a boxed wine.  Many people wrinkled their noses at twist off caps as well and they are now very common.

For this meal we used a Cabernet Sauvignon from Chile. This boxed wine is fantastic for the money and the beauty is that once you open the box, it stays fresh for 6 weeks. There are four 750 ml bottles in one box.

For people like ourselves that do a lot of RV'ing and for boaters, these fine boxed wines are so easy to take along. Less weight and space.

Kiss the cook,

Anders


Rock Cod With Parmigiano and Shrimp Topping

Broiled Rock Cod


Rock Cod With Parmigiano and Shrimp Topping
This is a relatively easy recipe to make, and you are guaranteed to impress your guests.

Broiled Rock Cod with Parmigiano and Shrimp topping is a bit on the rich side, but the taste is out of this world.

When I created this recipe I built on Jeanette's Heavenly Sole recipe. I re-worked it to suit the shrimp meat better by adding Dill. The herb "Dill" takes me back to my Swedish roots, where we use a lot of Dill in our recipes. Dill just really sets this dish apart.

We are very lucky and catch our own Rock Cod here on the West Coast of BC.

If you can't catch your own, then head to your local fishmonger and ask for a nice fillet, or more, if you have the clan coming over.

You should count about 150-200 gram of fish per person or ⅓ lb to ½ lb per person.

Rock Cod With Parmigiano and Shrimp Topping & trimmings
Rock cod has white, mild flavoured meat. We are only allowed to fish for Rock Cod from April till October in our area, so we freeze any extra we have in water.

Feel free to use any kind of white fish you have available.

This recipe is for two to three people.


Here are the ingredients:

  • One large Rock Cod Fillets, pin bones out.
  • 1 cup or 240 ml of grated Parmigiano-Reggiano
  • ¾ cup or 180 ml of Hellman's Mayonnaise
  • 2 tbs or 30 ml of Dried Dill
  • 2-3 tbs or 30-45 ml of Half and Half or Cream
  • 1 cup or 240 ml of Wild Shrimp
  • 1/2 lime (or lemon)
  • 1 tbs of butter
half a lime on a cutting board.
Lime

Rock Cod in Oven Proof Dish


Fold Shrimp in to Parmigian Mixture
Turn your oven on to Broil and set your top rack to about 6 inches or 15 cm from the top of the oven.

Rip off a piece of wax paper, grab the butter and coat the inside of an oven proof dish. The dish should fit the fish nicely.

Grab the half lime and squeeze the lime juice over the fish fillet, making sure it covers all of it. Set the time for 10 minutes.

In a medium size bowl, grate the cheese with a Zyliss cheese grater. You can use any grater but use on fine setting. Add the mayonnaise and mix well. Now add the Dill and Half and Half and mix together. The consistency should be like a soft paste but not runny. Add some more Half and Half if needed. Fold in the shrimp.

The 10 minutes should be up now, insert the fish in the oven and set your timer for 3-4 minutes keeping a close eye on your fish. It will take about 8-10 minutes for the fish to cook. It should be flaky when you use a fork.

With a pair of oven mitts, remove the dish on to a trivet (cork board, cutting board or ....). Then cover the fish with the Shrimp Parmigiano mixture.

Fresh out of the oven, topping nicely browned
Return to the oven for a few minutes watching very closely! It burns really quick here. After a few minuets it should bubble and fizz. Once it is starting to turn a nice brownish colour, remove from oven back on to the trivet.

Let cool for about 3-5 minutes and serve with steamed sweet potatoes and asparagus. You can serve with what ever veggies you want. You can also add some rice or quinoa.


Wine Pairing and Recommendations:


A bottel of Ehrenfelser from Gehringer Brothers in Okanagan Valley, BC.
Ehrenfelser Gehringer Brothers
Here I would go with a nice white wine like a Pinot Gris from Township 7 Vineyard and Winery. This is great easy drinking wine that goes really nicely with fish.

Check out my wine review of the Township 7 Pinot Gris.

Further you could go with an Ehrenfelser from Gehringer Brothers. Both these wines are local BC wines and super good.

Cheers,

Anders


Seared Tuna Loin on BBQ

Seared Tuna Loin On The BBQ

Seared Tuna Loin
Seared Tuna Loin

If you love Sushi and fish, this is a really an easy and quick recipe.


Just head over to see your favourite fisherman or grocer and pick up a nice tuna loin.


The ingredients are as follows:
  • One whole loin of tuna (Sashimi grade)
  • 3 tbs Canola Oil
  • 3 tbs Teriyaki Sauce (or soy sauce, I prefer Niko Sauce from Campbell River, BC, Canada)
If the tuna loin is frozen, thaw it out, then marinate it in the oil and teriyaki sauce (about 3tbsp of each mixed together). Let the loin marinate for about one hour. If you prefer a strong flavour, you can go 3-4 hours. Just don't over do it.

Marinate The Loin.
Marinate The Loin.
When it comes to cooking the loin, I prefer to do it on the BBQ or in a sizzling hot Cast Iron frying pan.

If you cook in a frying pan, depending on the size of your pan, you probably have to cut the loin into two or three pieces.


The trick to cooking a good Sashimi grade tuna is to just sear it on the outside, it should be raw in the middle.

Tuna Loin And Vegetables
The cooking time in a frying pan is a bit faster then on the BBQ. In the frying pan about 1 minutes on each side (three sides) and on the BBQ 2 minutes.

You can cook it more if you prefer, but don't over cook. I like my tuna loin just to be seared ever so little on each side.

I like to serve the tuna with my Wasabi Cream Sauce, they go fantastic together. For vegetables, try stir-fried veggies on the BBQ. It is so easy and has a fantastic flavour

Once cooked, let the loin sit for one minute then cut in to serving pieces or slice (about 1/2" thick) and serve on a plate with the vegetables and Wasabi Cream Sauce. Delicious!

Kiss the Cook,

Anders

Coq au Vin à la Mode du Chef

Coq au Vin recipe

This is a great one-pot meal that does take some time to make, but is worth the extra time and effort. This recipe is from my nephew Sven in Switzerland. Sven made this for us one evening many years ago.

Take it away Sven.

The following recipe feeds about 4 people.

Ingredients:

  • 1 big red onion (sliced to 1/2" strips)
  • 2 large carrots (sliced to big pieces 3/4 inch)
  • 1 whole chicken (cut into good portions)
  • 1-1.5 liter of good red wine (preferably Burgundy, but any red wine will really do)
  • 3 cup of fresh mushrooms (sliced into big pieces)
  • 1 cup of pearl onions
  • 1 cup bacon (chopped into “bite-sized” pieces)
  • 5 cloves of garlic (chopped)
  • thyme
  • rosemary
  • bay leaf

Soak the chicken, onion and carrot pieces 24 hours in the red wine. Take the pieces out. Dry the chicken pieces with a paper towel and season them with salt and pepper. Run the wine through a sieve and set aside.

Brown the chicken in a frying pan. Then saute the bacon, onion, carrots, mushrooms and garlic. Add the wine with the rest of the ingredients and let it braise at least an hour.

Before you serve it you may want to sieve the sauce and reduce it somewhat more. You can also thicken the sauce by adding a tbs. of flour dissolved in cold water. Salt and pepper to taste.

Serve the Coq au vin with french bread

Wine recommendation for this would be a nice Burgundy.

Mais, ça c'est bon!

Sven

Thanks Sven, it's just so good.

Anders' Gnocchi in Cambozola Sauce

Gnocchi Anders' Way


Gnocchis in Cambozola Sauce
Gnocchi in a good cheese sauce with a good bottle of wine and you are as close to heaven as you can get. When my wife Liz and I visited the Italian speaking part of Switzerland "Lugano" a few years back, we had one of those dinners that is to die for.

We walked around Lugano on a beautiful June evening and found a restaurant where there was a line up out on the side walk. Said and done, this must be a good one, and the wait was worth it.  My order was Gnocchi in Cambozola sauce.

Lugano in the Italian Part of Switzerland
Lugano, in the Italian speaking Part of Switzerland
Gnocchi are made from either wheat flour or potato or a combination. I prefer then more on the potato side.


Cambozola is a German soft cheese with some blue Penicillium roqueforti mold in it.


The Italian Gorgonzola, Roqufort and Stilton also have the same molds.

The Cambozola is a bit milder than the Gorgonzola. But use whatever you can get your hands on.

Ingredients are as follows:
  • 500 grams of Italian Goncchi
  • 3 tbs of butter
  • 1 tbs of olive oil
  • 1 clove of garlic (or more, or much more :)  )
  • 2-3 tbs of fresh thyme, chopped.
  • squeeze of lemon
  • 300 ml of half and half (half cream and half milk will do). For a richer flavour use whipping cream
  • 1 cup of grated Parmigiano-Reggiano
  • 100-150 grams of Cambozola (cubed)

Gnocchis Boiling in water
Gnocchi Boiling

Ingredients For The Cambozola Sauce. Garlic, thyme, lemon, parmigiano and cambozola cheese
Ingredients For The Cambozola Sauce

Cambozola Sauce in pan.
Cambozola Sauce
In a sauce pan add lots of water with salt and once boiling add the Gnocchi. Cook as per directions or approximately 5 minutes.

While the Gnocchi are boiling, melt the butter and add the olive oil in a large frying pan.

Add the the garlic, watch not to burn the garlic, cook for a minute, then add the chopped thyme. Cook for another minute while stirring.

Add a squeeze of lemon, stir some more for another minute. Then add the half and half cream.

Now the important part, Do Not Boil At Any Time!! if you do, it will more then likely curdle on you (still tastes good though).

Once the cream is close to boil, add the Parmigiano, it will dissolve fairly quickly, then add the Cambozola, a few pieces at the time.

They will take a bit to dissolve, and they don't have to dissolve completely, it's OK.

Once you add the last bit of Cambozola, remove from heat and stir.

Your Gnocchi should be done by now, drained and tossed with a bit of olive oil.

Serve in a large bowl, Gnocchi in this sauce....... it's so good.

Wine Pairing and Recommendation:


A good Italian wine would be in order or, how about a Spanish wine, Castillo de Almansa Reserva from Bodegas Piqueras winery. This is a great wine (I'm sipping  a glass right now), a blend from Tempranillo, Monastrell and Granach grapes. It is a bargain at around $14.00

The Bodegas Piqueras winery was established in 1915 and was one of the first in the region to age wine in Oak barrels. Today they export to 15 countries around the globe and Canada is one of them.

Kiss the Cook,

Anders